
PosiTector DPM Dew Point Meter Online Instruction Manual
|
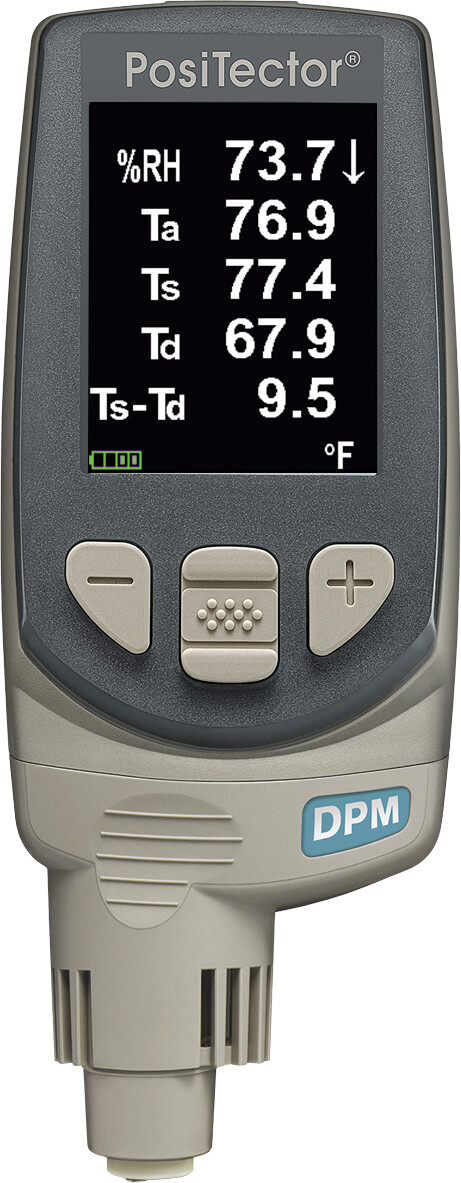
The PosiTector Dew Point Meter (DPM) is a hand-held, electronic Gage that continually measures, calculates, and records climatic conditions quickly and accurately. It consists of a body (Standard or Advanced) and probe
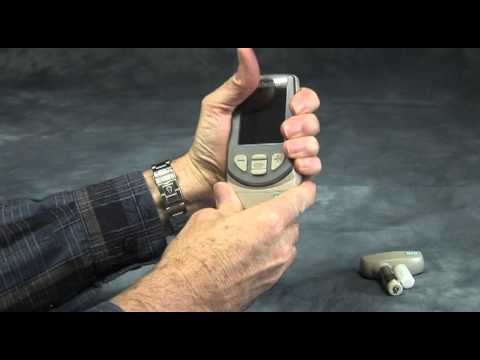
The PosiTector DPM powers-up when the center navigation button![]() is pressed. Readings are updated automatically each second. To preserve battery life, the Gage powers down after approximately 5 minutes of no activity. All settings are retained.
is pressed. Readings are updated automatically each second. To preserve battery life, the Gage powers down after approximately 5 minutes of no activity. All settings are retained.
|

|
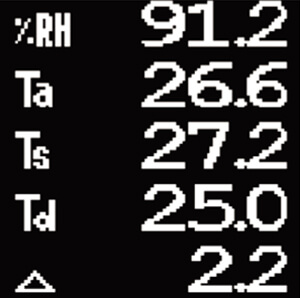
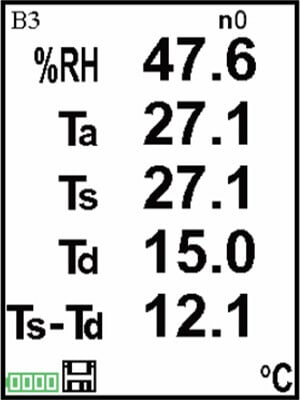
Typical Scree
- RH - Relative Humidity (measured)
- Ta - Air Temperature (measured)
- Ts - Surface Temperature (measured)
- Td - Dew Point (calculated)
- Ts-Td - Surface minus Dew Point Temperature (calculated)
- Tw - Wet Bulb Temperature (calculated) (Advanced Models Only)
- V - Wind Velocity (DPM-A model only)
NOTE: DPM-D probes only display RH, Ta, & Td
Protective Cap
The PosiTector DPM is shipped with a protective plastic cap over the surface temperature sensor. Remove this cap prior to use. Replace it when the Gage is not in use to protect the sensor.
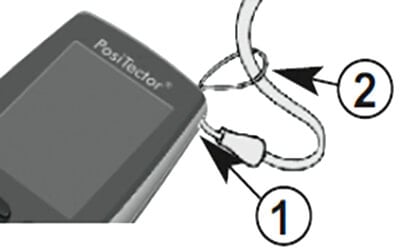
Wrist Strap We recommend attaching and wearing the supplied wrist strap. |
 |
Protective Lens Shield
The LCD is covered with a thin plastic film for protection against fingerprints and other marks during shipment. This film, while usually removed before using the Gage, can be left in place to protect against paint overspray or debris. Replacements can be purchased.
The PosiTector DPM powers-up when the center navigation button![]() is pressed. Readings are updated automatically each second. To preserve battery life, the Gage powers down after approximately 5 minutes of no button activity. All settings are retained.
is pressed. Readings are updated automatically each second. To preserve battery life, the Gage powers down after approximately 5 minutes of no button activity. All settings are retained.
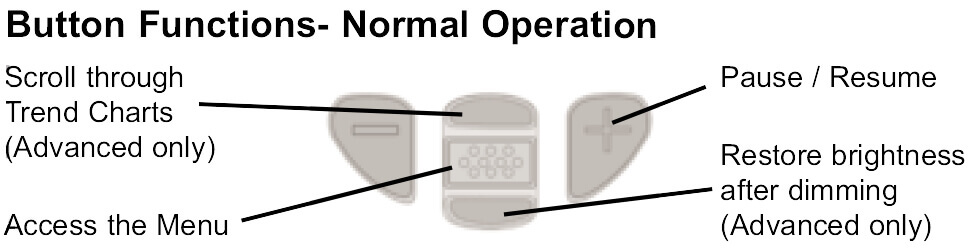
The Pause/Resume (+) button stops values from automatically updating to allow for closer examination of the relationship between the values or to allow time to manually record the entire dataset. Press (+) again to resume. |
 |
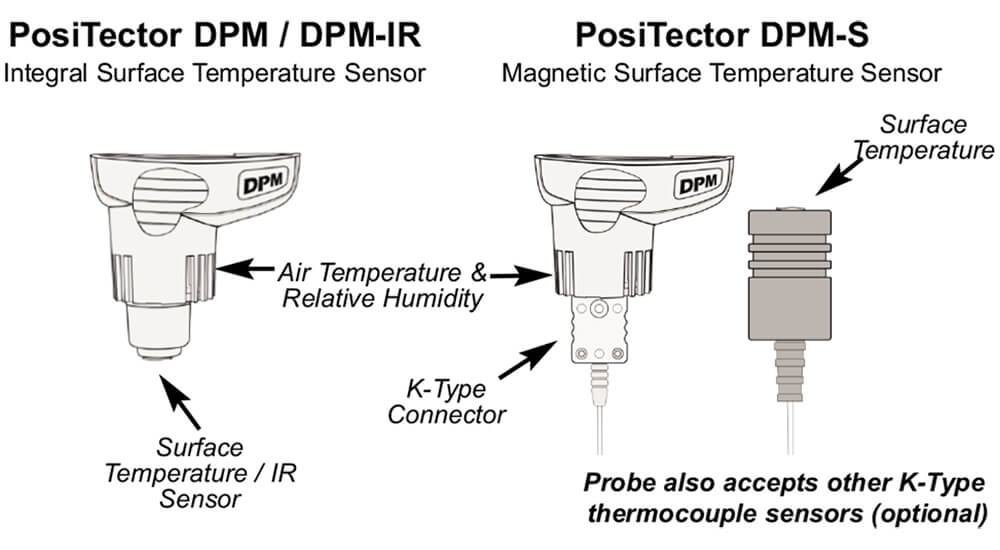
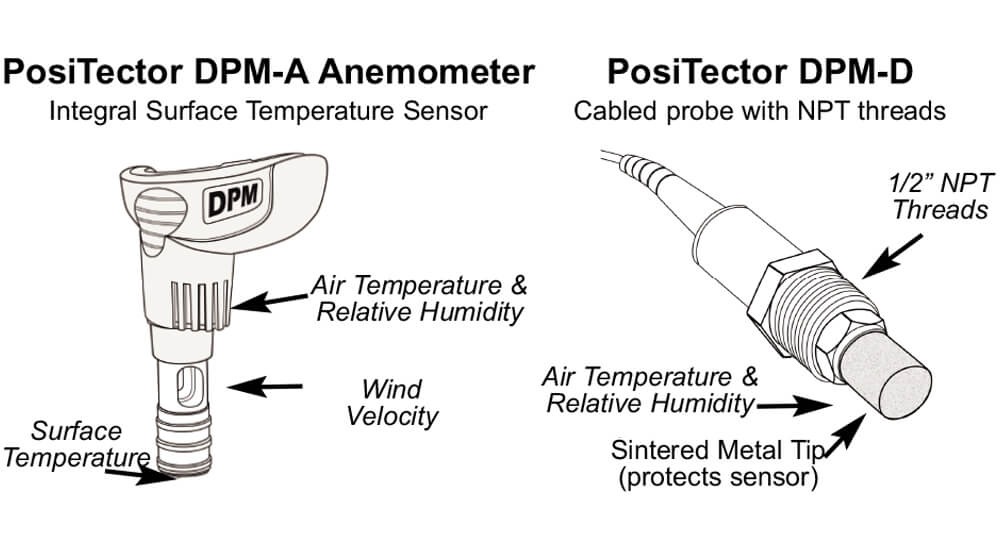
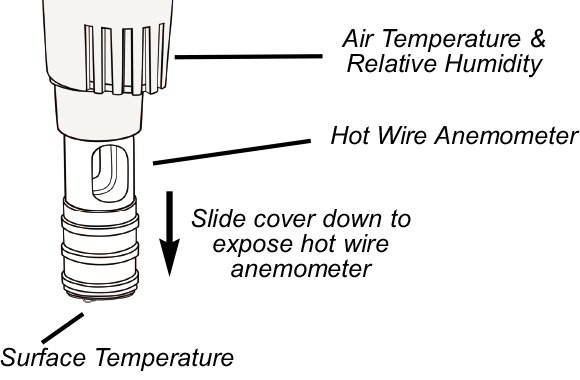
RH - The relative humidity sensor is located inside the probe housing. The sensor may require a longer period to stabilize in the event of extreme humidity changes.
Ta - The air temperature sensor is also located inside the probe housing. (Also known as Dry Bulb Temperature)
Ts - A surface temperature thermocouple is located on the tip of the probe (built-in probe model). It is spring loaded and designed to quickly self-align on a surface. Press it against a surface and allow a few seconds for the value to stabilize. Do not drag the sensor over the surface. Wet the surface for a faster response. Cover with the included protective plastic cap when not in use.
- NOTE: Does not apply to DPM-D models
- NOTE: For surface temperature measurement on steel over an extended of time, consider using the optional Magnetic Surface Temperature probe
Td - The dew point temperature is a function of air temperature and relative humidity (see ISO 8502-4 Annex A). It is the temperature to which a volume of air must be cooled in order to reach saturation.
Ts - Td - The surface minus dew point temperature is important in judging the risk of condensation, or dew, forming on a surface. For example, ISO 8502-4 recommends that, unless otherwise agreed, the temperature of a steel surface generally should be at least 3°C (5°F) above the dew point when protective coatings are applied.
- NOTE: Does not apply to DPM-D models
Tw - (Advanced models only) The wet bulb temperature is the temperature of adiabatic saturation. This is the temperature indicated by a moistened thermometer bulb exposed to air flow.
The wet bulb temperature is calculated from Ta and RH using an air pressure of 1.0 atmospheres (1013mbar). It approximates the temperature indicated by a moistened thermometer bulb exposed to airflow. Variations of Tw at other pressures could be greater than ±1°C (±2°F).
V - Wind velocity is measured with a hot-wire anemometer located inside the aluminum housing (DPM-A models only)
The Gage may require a period of time before the above climatic readings stabilize. This is most noticeable when the Gage is relocated from one extreme environment to another (i.e. from a warm location to a cold location). A period of up to 30 minutes should provide adequate time for stabilization.
Smart Trend TM Indicators |
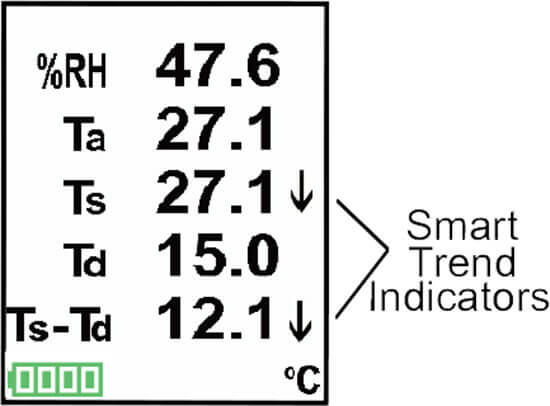 |
While the absence of an arrow does not necessarily signify stability, it can be taken to mean that particular reading is undergoing little or no change. Slow changes could therefore occur without being noted by an indicator arrow.
Calibration is the controlled and documented process of measuring traceable calibration standards and verifying that the results are within the stated accuracy of the Gage. Calibrations are typically performed by the Gage manufacturer or by a certified calibration laboratory in a controlled environment using a documented process.
The PosiTector DPM is shipped with a Certificate of Calibration showing traceability to a national standard. For organizations with re-certification requirements, the PosiTector DPM may be returned at regular intervals for calibration. DeFelsko recommends that our customers establish Gage calibration intervals based upon their own experience and work environment. Based on our product knowledge, data and customer feedback, a one year calibration interval from either the date of calibration, date of purchase, or date of receipt is a typical starting point. Written Calibration Procedures are available online at no charge at www.defelsko.com.
For industrial painters, the primary reason for measuring climatic conditions is to avoid rework and the premature failure of protective coatings. Recommendations and requirements are covered under various internationally recognized standards.
Temperature – It is important to measure both surface and air temperatures as they are often different. Application at incorrect temperatures can cause defects including: blistering, pinholing, cratering, dry spray & mud cracking. By measuring surface temperature it is possible to avoid potential application problems if air or surface temperatures become too hot or too cold for satisfactory film formation. Surface and air temperatures directly affect the rate of cure of the applied coating or lining system and are major factors in the formation of surface moisture or dew. ASTM D3276 Standard Guide for Painting Inspectors (Metal Substrates) states that the minimum air/surface temperature is usually 5ºC (40ºF).
Relative Humidity - the amount of moisture in the air expressed as a percent of overall volume. High relative humidity can retard the rate of solvent evaporation. For this reason, the maximum relative humidity at which coatings or linings can be applied and cured is generally set at 85%. This can be set as an alarm in the Advanced model.
Dew Point Temperature - the temperature at which moisture will begin to form on a surface. The dew point temperature is a function of air temperature and the relative humidity. (see ISO 8502-4 Annex A). It is the temperature to which a volume of air must be cooled in order to reach saturation. A number of major standards organizations call for careful dew point control. Moisture on a freshly blasted steel substrate will cause the steel to rust. If a thin, invisible film of moisture is trapped between the applied coating and the substrate, the system will likely fail prematurely. To ensure that dew point problems do not exist, ISO 8502-4 and SSPC guidelines state that the surface temperature must be a minimum of 3ºC or 5ºF above the dew point during the 3 critical phases of coating preparation, application, and cure.
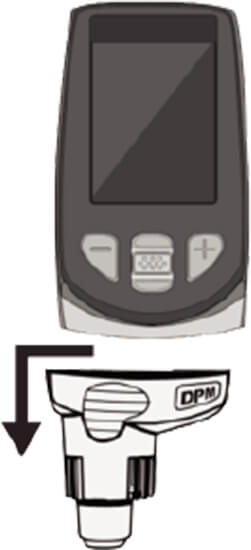
When powered-up, the PosiTector automatically determines which probe is attached and does a self-check. To disconnect a probe from a body, slide the plastic probe connector horizontally (in the direction of the arrow) away from the body. Reverse these steps to attach a different probe. It is not necessary to power-down the Gage when switching probes.
The PosiTector body accepts a wide variety of probe types including magnetic, eddy current and ultrasonic coating thickness, surface profile, shore hardness durometer, salt contamination and ultrasonic wall thickness probes. See www.defelsko.com/probes |
 |
 |
 |
The Magnetic Surface Temperature Sensor can be disconnected from the K-Type thermocouple connector (DPM-S model only) and replaced with one of the following optional sensors:
- Hand-held Surface Temperature Probe
- for spot checking hard-to-reach surfaces
- Self-adhering Surface Temperature Probe
- sticks to solid materials including aluminum, wood, concrete, etc. Ideal for unattended monitoring.
- Liquid Temperature Probe
- general purpose probe with stainless steel shaft
CAUTION: To ensure optimal performance of your PosiTector DPM, do not obstruct the airflow near the air temperature and humidity sensors. Keep fingers away from the sensor, as body heat can cause incorrect readings.
Allow time for the Gage to acclimate and for the readings to stabilize when moving the Gage between different environments.
When using the surface temperature probe, do not use excessive downward force, and do not drag it sideways. When the Gage is not in use, place the plastic cap over the surface temperature sensor to prevent damage.
NOTE: For DPM-A Probes, do not touch or attempt to clean the hot wire anemometer as damage to the sensor can result.

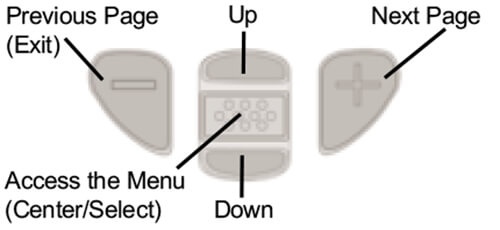
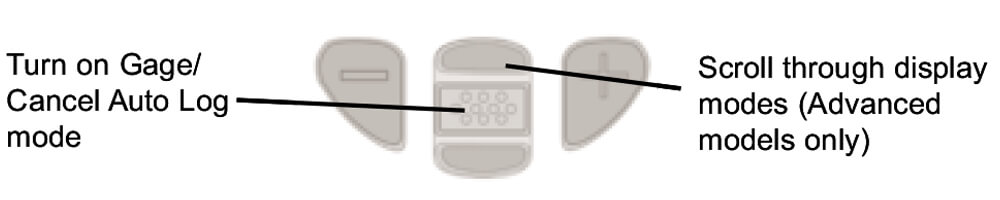
Gage functions are menu controlled. To access the Menu, power-up the Gage, then press the center navigation button![]() .
.
Below is a sample menu for a PosiTector DPM Advanced Model: |
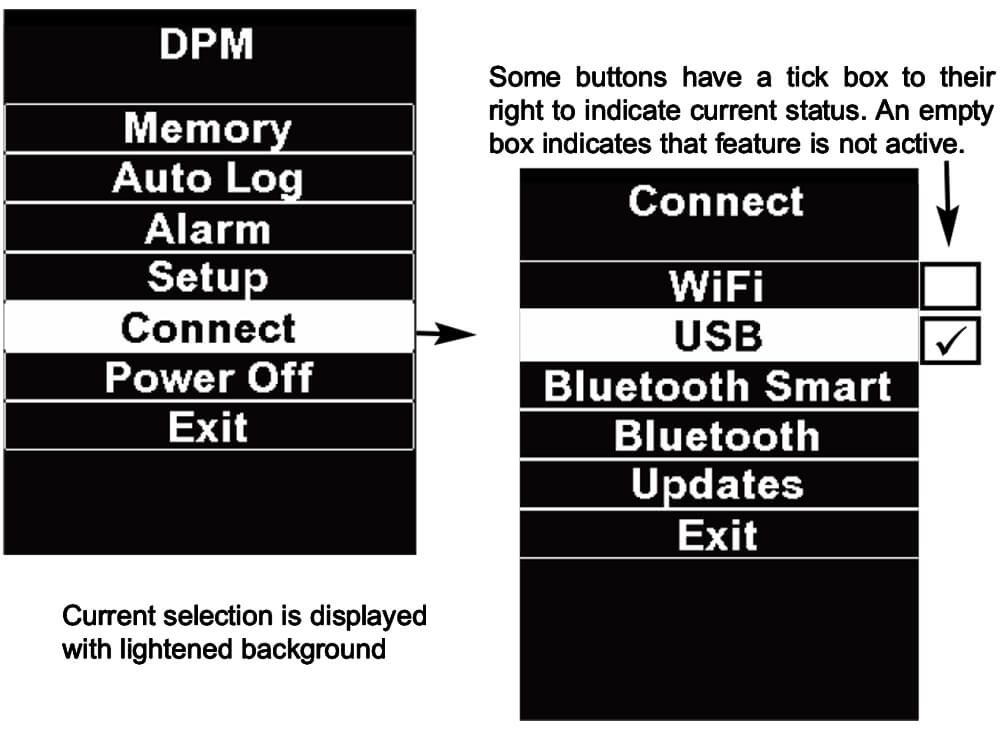 |
To navigate, use the Up and Down buttons to scroll vertically and |
 |
- Press the (+) button to switch pages in a multipage menu.
- Press the (-) button to return to the previous menu or page.
- Select Exit to exit from any menu.
The PosiTector DPM can automatically alert the user when current climatic conditions exceed pre-set values. When selected, the Alarm icon is![]() displayed at the top of the screen. According to ISO 8502-4 and ASTM D3276, steel surfaces should generally be 3°C (5°F) above the dew point when painting. The Alarm mode can be used in conjunction with Memory and Auto Log modes.
displayed at the top of the screen. According to ISO 8502-4 and ASTM D3276, steel surfaces should generally be 3°C (5°F) above the dew point when painting. The Alarm mode can be used in conjunction with Memory and Auto Log modes.
Standard models have one, fixed alarm. When selected, the Gage will alert the user when the surface temperature is less than 3°C (5°F) above the dew point temperature. Enable by selecting the tick box.
The Gage will alert the user with an audio tone and the LCD screen will reverse (see right) when conditions may be unsuitable for painting. |
 |
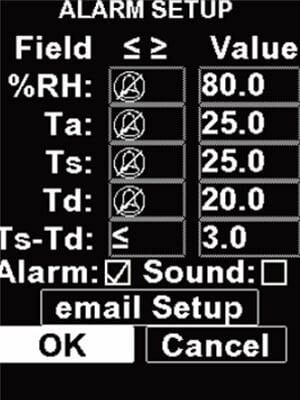
Advanced models allow the user to set up custom alarm conditions for each reading in a dataset. Use the Up and Down buttons to scroll through each value and corresponding operator. Advanced models also allow the user to configure the gage to send alerts via email.
For each reading, select between |
 |
In alarm mode, if an alarm condition is met, the relevant reading is displayed in red, and the Alarm icon![]() is displayed beside it (see image at right).
is displayed beside it (see image at right).
If the “Sound” checkbox was selected in the Alarm Mode setup screen, an audio tone will also be emitted. |
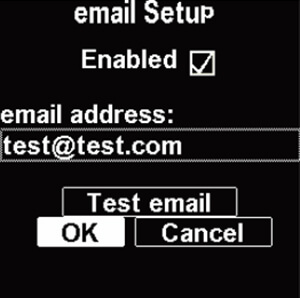 |
To configure alarm notification via email, select email Setup from the Alarm screen. Select the tick box to enable and enter a valid email address. An email test can be peformed by selecting Test email. Internet connection via WiFi or through PosiSoft Desktop is required for email Alarms.
(soft reset) restores factory settings and returns the Gage to a known condition. The following occurs:
- All batches, stored datasets, images and batch names are erased.
- Menu settings are returned to the following:
|
|
Perform a more thorough Hard Reset as follows:
- Power down the Gage and wait 5 seconds
- Simultaneously press and hold the (+) and
 center buttons until the Reset symbolappears. This returns the Gage to a known, “out-of-the-box” condition.
It performs the same function as a menu Reset plus:
- Bluetooth Pairing info is cleared.
- Alarm values are set to default.
- Menu settings are returned to the following:
|
|
- NOTE: Date, Time and WiFi are not affected by either Reset.
Language
Converts displayed and printed words to the selected language

Displays the model number & serial number, probe type & serial number, PosiSoft.net registration key, the amount of remaining memory for storage of readings, date and time, and software packages. For security purposes, the registration key is required to add the Gage to your free PosiSoft.net account.
![]() Wet Bulb (Advanced models only)
Wet Bulb (Advanced models only)![]()
When selected, the wet bulb temperature (Tw) is displayed on the main screen. It is calculated from Ta and RH using an air pressure of 1.0 atmospheres (1013 mbar). Variations of Tw at other pressures could be greater than ±1°C (±2°F).
![]() Anemometer (PosiTector DPM-A probes only)
Anemometer (PosiTector DPM-A probes only)![]()
When Enabled, the PosiTector DPM-A will display wind velocity (V) in the selected unit of measure |
 |
NOTE: Dew point (Td) and surface temperature (Ts) are not displayed when the Anemometer is enabled.
![]() Trend Chart (Advanced models only)
Trend Chart (Advanced models only)![]()
Displays a real-time graph of the readings over the last three minutes. Use Trend Charts to monitor short-term environmental changes and spot trends.
Shortcut: Press the Up button to scroll through the trend charts from the main screen.
Units: Converts the displayed units for temperature and wind velocity.
- Temperature (all models): Celsius (°C) or Fahrenheit (°F)
- Velocity (DPM-A only): m/s, ft/s, km/h, mph, and kn
- NOTE: Switching units will close any open memory batch
- NOTE: Alarm values do not have units.
Sound
Toggle the Gage sounds ON (checked) or OFF (unchecked).
Flip Display
This option causes the display to rotate 180°. Ideal for right-sideup viewing when the sensors are pointed away from the user.
- NOTE: DPM-A models automatically rotate when the instrument is reorientated .
Backlight (Advanced models only)
Selects display brightness (Sun, Normal or Night). All settings will dim slightly after a period of no activity to conserve battery life. Press the Down button to brighten the display
Set Clock
All batches are date-stamped when created, and all datasets are time-stamped (24 hour format) when stored into memory. It is therefore important to keep both the date and time current using this menu option. Use the Up and Down buttons to scroll, and the (-) and (+) buttons to adjust a value. The Gage’s date and time can also be viewed in Gage Info
Battery Type
Selects the type of batteries used in the Gage from a choice of “Alkaline”, “Lithium” or “NiMH” (Nickel-metal hydride rechargeable). If NiMH is selected, the Gage will trickle charge the batteries while connected via USB to a PC or optional AC charger. The battery state indicator icon is calibrated for the selected battery type. No damage will occur if the wrong battery type is selected.
- NOTE: DeFelsko recommends the use of eneloop (NiMH) rechargeable batteries. It may take as long as 12 hours to charge dead batteries.
Emissivity (PosiTector DPM-IR Models Only)
Sets the emissivity ratio for the PosiTector DPM-IR infrared temperature sensor
Select from a User Entered Value or one of the following preset options:
|
|
The PosiTector DPM has internal memory storage for recording measurement datasets. Stored datasets can be reviewed on-screen or accessed via computers, tablets and smart phones. Datasets are date and time-stamped. Datasets can be stored manually (using the (+) button), or automatically using the Auto Log mode
Button functions with Memory ON |
 |
Store up to 2,500 datasets in one batch. The following appears within the Memory menu
- On: turns memory on
- Off: turns memory off (stored datasets remain in memory)
- Clear: removes all datasets from memory
- View: lists group statistics and all stored datasets on the display. It will begin by showing statistics based on all readings in memory. Use the Up and Down buttons to scroll through all datasets. Pressto exit.
Store 100,000 datasets in up to 1,000 batches (groups).
The following appears within the Memory menu:
New Batch
Closes any currently opened batch and creates a new batch name using the lowest available number. For example, if only Batch 1 and Batch 3 exist, then Batch 2 would be created and made the current batch. The |
 |
Open
Selects a previously created batch name to open and make current. Use the (+) and (-) buttons to scroll through pages of saved batches. When selected, the batch name and number of stored datasets will be displayed.
Close
Stops the recording process, closes the current batch, and removes batch information from the display.
Delete
Removes a batch completely from memory. Use the (+) and (-) buttons to scroll through pages of saved batches. The name is deleted and all datasets are erased
View
Scroll using the Up or Down buttons through information, statistical summary, and a list of each dataset in the currently opened batch. Press![]() to exit.
to exit.
| x - Average ? - Maximum Value |
? - Standard Deviation ? - Minimum Value |
![]() Annotate (Advanced models only)
Annotate (Advanced models only)![]()
Create meaningful batch names and enter notes directly on the Gage using a familiar onscreen QWERTY keyboard. |
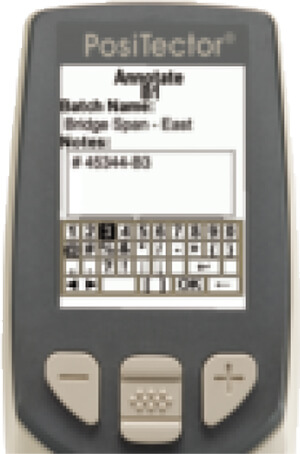 |
Use the Gages navigation and (-)(+) buttons to enter annotations.
Annotations can be synchronized with PosiSoft.net, the PosiTector App and are included in PosiSoft USB Drive reports.
Sends a statistical summary and individual datasets to the optional Bluetooth Wireless Printer.
- NOTE: To cancel printing, press and hold the (-) and (+) buttons simultaneously
Display options for the currently open batch are:
- Td, Ts, Ta, Ts-Td, %RH, V: A chart of batch readings
- Image: An image downloaded from PosiSoft.net during synchronization
- Notes: Instructions or notes downloaded from PosiSoft.net during synchronization.
- None: default screen showing current dataset
Shortcuts:
- When a batch is open, press Up to scroll through the above display options.
- Remove the last dataset from the current open batch by pressing (-).
![]() Summaries (Advanced models only)
Summaries (Advanced models only)![]()
Displays a summary of all stored batches including the name, probe type, number of readings and type.
In the following example, Batch 3 (B3) indicates an “F” 6000 coating thickness probe was used to record a total of “6” readings in “PA2” mode. |
 |
Press both (-)(+) buttons at any time to capture and save an image copy of the current display. The last 10 screen captures are stored in memory and can be accessed when connected to a computer
The PosiTector DPM can automatically record datasets into memory at user selected time intervals. When selected, the Auto Log icon![]() will appear on the display, with a countdown timer until the next dataset is stored. Readings on the display are only updated when a dataset is stored. Auto Log continues recording until the instrument loses power or the user turns off Auto Log mode. Stored datasets will remain in memory until full, then the oldest dataset or batch will be overwritten to allow space for the next dataset.
will appear on the display, with a countdown timer until the next dataset is stored. Readings on the display are only updated when a dataset is stored. Auto Log continues recording until the instrument loses power or the user turns off Auto Log mode. Stored datasets will remain in memory until full, then the oldest dataset or batch will be overwritten to allow space for the next dataset.
Auto Log continues recording until the instrument loses power or the user turns off Auto Log mode. Stored datasets will remain in memory until full, then the oldest dataset or batch will be overwritten to allow space for the next dataset. |
 |
- NOTE: It is recommended that fresh alkaline batteries be installed prior to an extended Auto Log if not connected to continuous USB power. Connect the Gage to a USB power source for long-term use using the included USB cable.
Standard models remain powered-up while in Auto Log mode. The last recorded dataset will remain on the display until the next dataset has been stored. The Gage will store datasets for 40-50 hours on a set of fresh alkaline batteries depending on the interval of the measurements.
Advanced models powers down between readings to conserve batteries. At each interval, the instrument will wake up, take a reading, sync to PosiSoft.net (if configured) and power down |
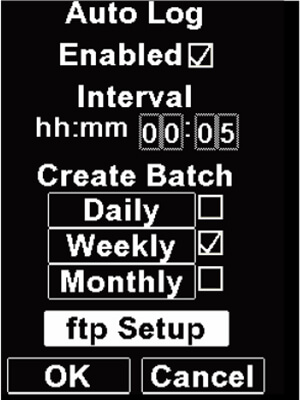 |
The instrument can record approximately 8,000 datasets while in this mode using alkaline batteries, and can be configured to Auto Batch at Daily, Weekly, and Monthly intervals
Datasets can be sent directly to a user-specified FTP site. The data is sent in a comma-delimited text files (one file per reading), which can be parsed for embedding in a web page or imported into a database. Ideal for use with custom developed software.
Select FTP Setup from the Auto Log screen to setup ftp transfer
Enable and enter the FTP Site address, username, and password. To test the connection select Test Upload. |
|
If connection fails, check FTP Setup settings and retry
Remote Monitoring of Environmental Conditions The PosiTector DPM is ideal for remotely monitoring environmental parameters over time on the jobsite, paint shop or manufacturing floor.
![]() Accessing Stored Measurement Data
Accessing Stored Measurement Data![]()
DeFelsko offers the following free solutions for viewing, analyzing and reporting data:
| Connect the Gage to a PC/Mac using the supplied USB cable. View and print readings and graphs using universal PC/Mac web browsers or file explorers. No software or internet connection required. USB Drive must be selected in the Gage’s “Connect > USB” menu. | 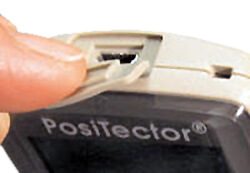 |
Powerful desktop software (PC/Mac) for downloading, viewing, printing and storing measurement data. Includes a customizable, templated PDF Report Generator. No internet connection required.
Web-based application offering secure, centralized storage of measurement data. Access your data from any web-connected device.
![]() PosiTector App (Advanced models only, s/n 784000+)
PosiTector App (Advanced models only, s/n 784000+)![]()
App for compatible iOS and Android smart devices. Permits users to create, save and share professional PDF reports. Add images and notes using the smart device’s camera and keyboard.
Allows connection to your local wireless network or mobile hot spot. Ideal for using your network's internet connection for synchronizing stored measurements with PosiSoft.net. See www.defelsko.com/wifi |
 |
Enable ![]()
Turns WiFi functionality ON. When selected, the ![]() icon will appear on the display. To deactivate WiFi, uncheck the Enable box.
icon will appear on the display. To deactivate WiFi, uncheck the Enable box.
Connect your smart device/computer to a PosiTector Advanced body wirelessly without the need for a separate network. Wirelessly import readings into PosiSoft Desktop v4.0 Software whenever a WiFi network is not available or out-of-range.
To enable, select Access Point from the Connect > WiFi menu. The Access Point icon ![]() will display in the upper left of the PosiTector display.
will display in the upper left of the PosiTector display.
Securing your Access Point -
To ensure the PosiTector is only accessible to authorized devices, it is important that you enter a passphrase (password) for the Access Point. The default Passphrase is password.
In the Connect > WiFi > Setup menu, select AP Passphrase.
Press ![]() button to display on-screen keyboard. Enter a Passphrase for the Access Point. The Passphrase will be required for all devices connecting to the PosiTector's Access Point.
button to display on-screen keyboard. Enter a Passphrase for the Access Point. The Passphrase will be required for all devices connecting to the PosiTector's Access Point.
The PosiTector is now visible to all WiFi enabled devices. Simply connect your devices WiFi to the new PosiTector Access Point. All PosiTectors are uniquely identified by their respective gage body serial numbers.
AP Channel - Default Channel: 6
For most users the default channel will not have to be altered. If you are experiencing poor connection or are unable to connect, try another channel.
In the Connect > WiFi > Setup menu, select AP Channel
Press the UP center navigation button to highlight the channel. Use the (-) or (+) buttons to change the channel. Press the DOWN navigation button and select OK. Press ![]() the button.
the button.
Networks: With WiFi Enabled the Gage will allow the user to add a new network and will automatically check for available local networks. Available networks detected by the Gage are listed on the screen along with any networks that the Gage has previously been connected to that are not currently within connection range.
Information: Gage displays information about the local WiFi network connection including.
- SSID: the network's name
- State: displays if the Gage is connected to the network or not
- IP Address: the network's IP Address
- Setup: Allows user to setup a WiFi connection
- IP Settings: enter the IP information as follows.
- IP Type (DHCP or Statis), IP Address,
- Gateway, Netmask, DNS1, DNS2
- Server Enable: enables a connection between the network and the Gage
- Gage Name: enter a name for the Gage (up to 14 characters)
- AP Channel: The access point channel corresponding to a frequency range. (Default Channel: 6)
- AP Passphrase: A series of characters, numbers or symbols used to log on to a WiFi network. (Default Passphrase: password)
- WiFi Reset: erases all WiFi settings
When USB Drive is checked ![]() , the PosiTector gage uses a USB mass storage device class which provides users with a simple interface to retrieve stored data in a manner similar to USB flash drives, digital cameras and digital audio players.
, the PosiTector gage uses a USB mass storage device class which provides users with a simple interface to retrieve stored data in a manner similar to USB flash drives, digital cameras and digital audio players.
USB Drive is also required to import stored measurements into PosiSoft Desktop software (pg.24). Once connected, any computer can view measurements stored in memory by navigating a virtual drive labeled "PosiTector” using the included USB cable.
A formatted HTML report is viewed by selecting the "index.html" or “START_HERE.html” file found in the root directory. Optionally, text ".txt" files located in each batch folder provide access to measurement values. Stored datasets and graphs can be viewed or copied using universal PC/Mac web browsers or file explorers.
When your PosiTector is first connected to your Windows PC via a USB cable, an enumeration process is started that installs device drivers without re-booting your computer. You may see several pop-up windows in the taskbar at the bottom right of your screen. Wait for the entire process to be completed before proceeding.
Serial Streaming via USB (Advanced models only, serial numbers 784000 and greater)
Advanced gage bodies have the ability to serial stream live readings from the USB port.
The following document links will help operators use this feature:
PosiTector Advanced USB Serial Streaming Instructions
Retrieving stored screen captures:
The last 10 screen captures stored in memory can be accessed by navigating to the "screen capture" directory within the "PosiTector" virtual drive.
- NOTE: When connected, power is supplied through the USB cable. The batteries are not sed and the body will not automatically power down. If rechargeable (NiMH) batteries are installed, the instrument will trickle charge the batteries.
The below WiFi, USB and Bluetooth menus contain a Sync .net Now option. When selected, the Gage immediately synchronizes stored measurement data via its respective communication method (internet connection required).
Alternatively, select Auto Sync .net from within the USB connect menu to automatically synchronize upon connection to a PC. Additional measurements added to memory while connected are synchronized only when the USB cable is disconnected and reconnected, or when the Sync .net Now option is selected.
WiFi connected gages automatically attempt synchronization upon power-up.
NOTE: PosiSoft Desktop is required when using USB or Bluetooth connections to synchronize measurements with PosiSoft.net.
(Advanced models only, serial numbers 784000 and greater) |
When Enabled ![]() , allows communication with a smart device running the PosiTector App via auto-pairing Bluetooth Smart (BLE) wireless technology.
, allows communication with a smart device running the PosiTector App via auto-pairing Bluetooth Smart (BLE) wireless technology.
Select ![]() batches to flag them for synchronization to the PosiTector App. New batches created while Bluetooth Smart is enabled are automatically selected.
batches to flag them for synchronization to the PosiTector App. New batches created while Bluetooth Smart is enabled are automatically selected.
Sync Batches
With Bluetooth Smart enabled, select Sync Batches to transfer selected ![]() batches to the PosiTector App. This is useful when switching between smart devices, as only readings and batches that have yet to be synchronized with any smart device are synchronized automatically.
batches to the PosiTector App. This is useful when switching between smart devices, as only readings and batches that have yet to be synchronized with any smart device are synchronized automatically.
NOTE: If Bluetooth Smart is disabled, data from batches selected in the Sync Batches menu are held in a queue until communication with the PosiTector App is re-established.
Send Batches
Transfers selected ![]() batches to the PosiTector App (useful when switching between devices).
batches to the PosiTector App (useful when switching between devices).
The Send Batches option is visible in the Bluetooth Smart menu when the Gage is connected to a smart device running the PosiTector App.
(Advanced models only)
Allows individual readings to be sent to a computer, printer or compatible device as they are taken using Bluetooth wireless technology. See www.defelsko.com/bluetooth |
Pairing
The instrument and receiving device must be paired before stored or streamed datasets can be transmitted. For pairing instructions, see http://www.defelsko.com/bluetooth
Info
Lists information about your current Bluetooth connection, including the currently paired device and MAC address..
Stream
When checked, the instrument will stream datasets to the paired Bluetooth Device as they are taken. Datasets can be streamed as they are taken to the optional Bluetooth printer or third-party computer software.
Powder Probes
Displays menu options that enable the PosiTector body to communicate with wireless PosiTector PC probes. See http://www.defelsko.com/pc
Determine if a software update is available for your Gage. See www.defelsko.com/update
To perform an update the Gage must be connected to an internet connected PC with PosiSoft Desktop or WiFi network. |
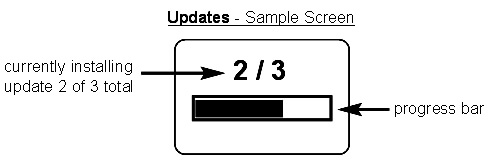 |
WARNING: Ensure that stored measurements are backed up to a PC or PosiSoft.net.
The Gage will perform a Hard Reset after an update. All stored measurements will be erased from memory.
![]() Do Not unplug the Gage during the update operation.
Do Not unplug the Gage during the update operation.
![]() Power Supply / Battery Indicator
Power Supply / Battery Indicator ![]()
Power Source: 3 AAA alkaline, Lithium or optional Nickel-metal hydride (NiMH) rechargeable batteries. For best battery indicator results, ensure the appropriate Battery Type is selected in the Setup > Battery Type menu.
The battery indicator ![]() displays a full bar with fresh alkaline or fully charged batteries installed. As the batteries weaken, the bar will be reduced. When the battery symbol is low
displays a full bar with fresh alkaline or fully charged batteries installed. As the batteries weaken, the bar will be reduced. When the battery symbol is low ![]() the Gage can still be used, but the batteries should be changed or recharged at the earliest opportunity. The Gage will turn off automatically when batteries are very low, preceded by a Low Battery Warning on the display.
the Gage can still be used, but the batteries should be changed or recharged at the earliest opportunity. The Gage will turn off automatically when batteries are very low, preceded by a Low Battery Warning on the display.
![]() To retain all user settings and stored memory readings, only replace the batteries after the instrument has powered-down. Battery performance decreases at low temperatures.
To retain all user settings and stored memory readings, only replace the batteries after the instrument has powered-down. Battery performance decreases at low temperatures.
Battery performance decreases at low temperatures
Most conditions can be cleared with a Hard Reset. If not, visit our Service & Support page for information on sending your Gage to us for a no charge evaluation.
When the surface temperature probe is not on a surface, Air Temperature and Surface Temperature appear to be different
Under normal conditions with the surface probe in air Ta and Ts should be within the combined tolerance of each sensor (typically 1°C each). It is possible for the difference to be larger if the surface probe has recently been in contact with surfaces that are at a different temperature than air.
RH value is slow to stabilize
If the probe is exposed to very low humidity for an extended time period and then placed in a high humidity environment, the displayed Relative Humidity (RH) may appear to respond slowly. Allow the probe to stabilize 30 minutes for a change of RH greater than 50%. It may take longer if the probe was left at low RH for several months. To increase response time wrap the sensor in a damp cloth overnight to recondition the RH sensor.
Surface Temperature reads much higher than expected
The probe tip may be dirty or damaged. Use care if attempting to clean dirt or overspray from the sensor. If Ts continues to read high then return the probe for service.
Surface temperature value does not agree with expected surface temperature or surface temperature probe is slow to respond
In some cases the surface being measured is very rough and a good thermal connection from the probe tip to the surface is not possible. If possible place a small drop of water on the surface and then place the probe tip into the water drop. Quick and accurate results can be obtained in this manner.
Conforms to: ISO 8502-4, BS7079-B and ASTM D3276
Operating Range: -40° C to +80° C | -40° F to +175° F
PosiTector DPM, DPM-S, DPM-A, DPM-D, DPM-IR
| Range | Accuracy | Resolution | |
| Surface Temp | -40° to 80° C 80° to 190° C -40° to 175° F 175° to 375° F |
±0.5° C ±1.5° C ±1° F ±3° F |
0.1° C 0.1° C 0.1° F 0.1° F |
| IR Surface Temp.** | -70° to 380° C -94° to 716° F |
±1° C + (0.01°C/°C)*** ±2° F + (0.01°F/°F)*** |
0.1° C 0.1° F |
| Air Temp | -40° to 80° C -40° to 175° F |
±0.5° C ±1° F |
0.1° C 0.1° F |
| Humidity | 0 to 100% | ±3 % | 0.1 % |
| Wind Speed* | 0 - 20 m/s 0 - 65 ft/s 0 - 3900 fpm, 0 - 72 km/h 0 - 44 mph 0 - 38 kn |
±3 % + least significant digit |
0.1 m/s 0.1 ft/s 1 fpm, 0.1 km/h 0.1 mph 0.1 kn |
**DPM-A Models Only
**DPM-IR Models Only
***At Ta = 23° C
PosiTector DPM-IR:
- Distance to Target Size Ratio (D:S) - 5.7:1
- Response Time: <500 milliseconds (95% resposne)
- Spectral Response: 8 - 14 um
This device complies with part 15 of the FCC Rules. Operation is subject to the following two conditions: (1) This device may not cause harmful interference, and (2) this device must accept any interference received, including interference that may cause undesired operation.
Before returning the instrument for service
- Install new batteries in the proper alignment as shown within battery compartment.
- Examine the surface temperature sensor for dirt or damage.
- If the humidity sensor is slow to respond or reading erratically, recondition the sensor by removing the probe from the gage body and wrapping it in a damp cloth overnight.
- Perform a Hard Reset.
- If issue is not resolved, Update your PosiTector gage body and re-attempt measurements.
![]() Limited Warranty, Sole Remedy and Limitied Liability
Limited Warranty, Sole Remedy and Limitied Liability![]()
DeFelsko's sole warranty, remedy, and liability are the express limited warranty, remedy, and limited liability that are set forth on its website:
www.defelsko.com/terms
© DeFelsko Corporation USA 2017
All Rights Reserved
This manual is copyrighted with all rights reserved and may not be reproduced or transmitted, in whole or part, by any means, without written permission from DeFelsko Corporation.
DeFelsko and PosiTector are trademarks of DeFelsko Corporation registered in the U.S. and in other countries. Other brand or product names are trademarks or registered trademarks of their respective holders.
Every effort has been made to ensure that the information in this manual is accurate. DeFelsko is not responsible for printing or clerical errors.
21 Waterway Avenue
Suite 300
The Woodlands, TX 77380
U.S.A.
Tel: 1-281-516-9292
Fax: 1-866-234-0451
E-Mail: info@abqindustrial.net