Testex Press-O-Film Replica Tape - Online Instructions Manual
Testex - the low-cost way to measure profile
![]() Introduction
Introduction![]()
Testex is the manufacturer of Press-O-Film replica tape. Press-O-Film provides inspectors and researchers a simple way to obtain an impression of a surface. |
 |
Press-O-Film (POF) consists of a layer of crushable plastic microfoam coated onto a polyester film of highly uniform thickness.
When compressed against a roughened material, Press-O-Film accurately replicates details of its surface roughness.
The impression can be studied in several ways:
- A simple micrometric dial thickness gage can be applied to the replica for field measurement of the average maximum peak-to-valley roughness, or "profile," of a replicated surface, or,
- A digital thickness gage such as the PosiTector RTR can also field-measure profile and bridge the gap between tape grades by incorporating automatic linearization.
- An optical profiling interferometer or confocal microscope can be used in laboratory settings to produce maps of the replica's surface topography. This is most appropriate to study of subtle features at the microinch (25 nanometer) level.
![]() Linearization
Linearization![]()
Linearization and the PosiTector RTR Replica Tape Reader
Few methods of measurement are perfectly proportional in their response to changes in the property they measure. This is true of replica tape. An averaging procedure applied to the "overlap region" between Coarse and X-Coarse grades of tape is used to compensate for this phenomenon when inspectors use a spring micrometer.
An alternative to spring micrometer measurement of replica tape thickness is use of an instrument like the PosiTector RTR (Replica Tape Reader) which combines height measurement with "linearization" to improve the accuracy and ease of use of the replica method.
Linearization is a technique used to insure uniform accuracy of measurement in many types of advanced sensors. Its use in connection with replica tape is described here.
![]() How It Works
How It Works![]()
Testex is the manufacturer of Press-O-Film replica tape. Press-O-Film provides inspectors and researchers a simple way to obtain an impression of a surface. |
 |
- Replica tape consists of a layer of compressible foam affixed to an incompressible polyester substrate.
- When pressed against a roughened (steel) surface, the foam collapses...
- Acquiring an impression of the surface.
- Placing the compressed tape between the anvils of a micrometric thickness gage, and subtracting the contribution of the incompressible substrate (50 micrometers or 0.002 inches), gives a measure of the surface profile
![]() Background
Background![]()
Some Background on Using a Micrometric Gage to Measure Profile
What replica tape is:
Testex Press-O-Film replica tape consists of a layer of crushable plastic microfoam coated onto polyester film of highly uniform thickness.
It is sold in a number of grades to accommodate measurements in different profile ranges.
Why determination of profile is important:
Industrial steel in bridges, ships, railcars, etc., is almost always painted or otherwise coated to prevent corrosion. Before they can be painted, these metal surfaces must be cleaned and roughened to insure that the paint adheres. This is usually done by grit or shot blasting the surface. If the resulting surface is too smooth, the paint or coating will not stick. If the surface is too rough, the peaks poke through the coating and rusting occurs.
How replica tape allows field (gage) measurement of profile:
When compressed, by “burnishing,” against a surface, the foam collapses to about 25% of its pre-collapse thickness. After compression, the foam acquires an impression of the surface against which it is burnished. The highest peaks on the original surface displace the fully compressed foam and come to rest against the polyester backing. The deepest valleys on the original create the highest peaks in the replica. Consequently, the thickness of the compressed tape equals the average maximum peak-to-valley profile plus the thickness of the incompressible polyester substrate. A spring-loaded micrometer gage is used to measure the thickness of the replica.
Characteristics of the spring micrometer gage:
All characterization of replica tape profile measurements has been performed with a gage having a measurement accuracy of 0.2 mil (5 microns), closing force of 3 ounces (1.1 N) and at least one anvil having a circular diameter of 0.25 inch (6.3 mm). Suitable inch and metric unit gages are available from Testex and other companies but great care should be taken to assure that they are specifically designed to be used with replica tape.
Using the proper gage is essential to obtaining correct profiles.
![]() Tape Grades
Tape Grades![]()
Testex Press-O-Film replica tape is available in a variety of thicknesses to facilitate profile measurement in differing ranges.
The primary range for measurement with replica tape is 0.8 to 4.5 mils (20 to 115 um). Use of Coarse Minus grade (<0.8 mil or <20 um) or X-Coarse Plus grade tape (>4.5 mil or >115 um) should be restricted primarily to checking measurements at the lower and upper ends of the primary range.
| Grade (descriptive) | Range When Used With Gage (mils) / (um) |
| Fine / Medium | not applicable |
| Coarse Minus | 0.5 to 1.0 / 12 to 25 |
| Coarse | 0.8 to 2.5 / 20 to 64 |
| X-Coarse | 1.5 to 4.5 / 38 to 115 |
| X-Coarse Plus | 4.6 to 5.0 / 116 to 127 |
Further information (pdf format) on X-Coarse Plus grade tape is available here.
Testex replica tape can be used with a gage to measure the surface roughness ("profile") of blast-cleaned steel in the roughness range 0.8 to 4.5 mils (or 20 to 115 micrometers). Because inspectors, as a rule, have a target profile in mind. it is always best to start measurements with the grade of tape that has the target profile closest to the center of it's range.
Our Instructions webpage details the averaging procedure used in the overlap region between Coarse and X-Coarse grades.
Testex' lowest grade (thinnest) tape, Coarse Minus, should be used only to check measurements at the lower end of the next higher grade, Coarse, while our highest grade tape, X-Coarse Plus, should only be used to check measurements at the high end of the X-Coarse grade range.
Firmly compress tape with the smoothest surface on the rubbing tool provided, applying sufficient pressure to produce a replica with a uniform pebblegrain appearance. You should feel the roughness as you burnish.
Fine/Medium grade material is commonly used in applications in which the replica is analyzed using precision laboratory techniques. This grade is not suitable for use with a "dial thickness gage. Fine grade tape (rarely used) has a thin Gold coating to facilitate electron microscopy. Medium grade tape has a thin Indium coating to facilitate optical interferometric measurement. Fine and Medium grades have the same foam thickness. Only the vapor-deposited metallic coatings differ. "Unmetallized" Medium grade tape is also available without any metallic coating.
All grades are coated onto a tough polyester substrate 2.0 mils (50 um) in thickness.
Because implicit definitions of "roughness" vary between methods, numerical profiles determined using different techniques (replica tape, interferometer, confocal microscope, analog stylus, digital stylus) may yield different values. Always specify the technique used.
![]() Precision Metrology
Precision Metrology![]()
Replication and Measurement of Submicron Features - Indium Coated Press-O-Film
"Metallized" Press-O-Film can be used in a range of scientific and industrial applications to obtain accurate, easily made, permanent surface replicas easily studied with precision optical instruments. Metallization, to increase the replica's reflectivity, consists of pre-coating the foam surface with a thin (0.08 µm) layer of Indium.
In the flexographic printing industry metallized replica tape is used with interferometric optical profilers to check the wear on printing rolls. It is preferable to measure a replica, rather than the original, because of the cost, complexity and delicacy of these instruments. Replica tape makes it possible to bring the surface to the measuring device.
- For measurement of profiles up to about 5 µm = 0.2 mil, we recommend "Medium" grade metallized tape.
- For measurement of profiles up to about 25 µm = 1 mil we recommend "Coarse" grade metallized tape.
- For measurement of profiles up to about 100 µm = 4 mil we recommend "X-Coarse" grade metallized tape.
A metallized roll allows for 50 impressions. Optional mounting slides.
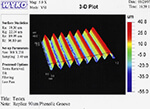
Below are representative measurements (made with WYKO / Veeco profilers):
Original and replica of a very small profile feature |
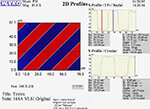 |
(50 nm = 0.05 ?m = 2 microinch = 100 atoms "plateaus" |
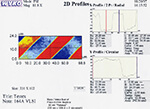 |
Original and replica of a medium profile feature |
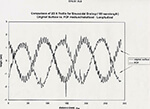 |
Original and replica of a coarse profile feature |
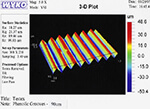 |
 |
![]() Instructions
Instructions![]()
| Testex X Coarse Grade Press-O-Film Replica Tape - Quick Start Inch |
| Testex X Coarse Grade Press-O-Film Replica Tape - Quick Start Metric |
| Testex X Coarse Grade Press-O-Film Replica Tape - Instruction for Linearizing Gage |
| Testex X Coarse Grade Press-O-Film Replica Tape - Quick Start Spanish |
Detailed Step-by-Step Instructions for using Press-O-Film With a "Testex Dial Thickness Micrometer Gage":
Note: The graphic on each piece of tape will help you remember the new (Step 9) averaging procedure.
- Step 1: Locate a representative site for measurement.
- Step 2: Select an appropriate grade of Press-O-Film replica tape based on your target profile:
| For 0.8 to 2.5 mils (20 to 64 um) | => “Coarse” grade |
| For 1.5 to 4.5 mils (38 to 115 um) | => “X-Coarse” grade |
The primary range for measurement with replica tape is 0.8 to 4.5 mils (20 to 115 um).
Use of Coarse Minus grade (<0.8 mil or <20 um) or X-Coarse Plus grade tape (>4.5 mil or >115 um) should be restricted to checking measurements at the lower or upper ends of the primary range. Further information (pdf format) on X-Coarse Plus grade tape is available here.
- Step 3: Prepare the snap gage: clean anvils, adjust zero point to read minus 2.0 mils, the thickness of the incompressible substrate. On a conventional Testex thickness gage a setting of minus 2.0 mils is equivalent to a setting of (plus) 8.0 mils. (Pre-setting the gage in this way subtracts the thickness of the incompressible plastic substrate automatically from all readings.)
- Step 4: Pull a single piece of adhesive-backed tape free of its release paper. The Press-O-Film replica material is the 0.4 inch (1.0 cm) square white plastic film at the center of the adhesive-backed paper. A “bulls eye” circle of paper should remain behind on the release paper (i.e., it is not used in the measurement.)
- Step 5: A pre-check of film thickness is good practice. Uncompressed X-Coarse grade has a foam thickness of 5.5 mils ( 140 ?m ) ± 0.5 mils ( 12 ?m ).
- Step 6: Apply film to blasted surface. Press adhesive-backed paper to hold it firmly in place.
- Step 7: Firmly compress replica film with the smoothest surface on the round-end rubbing tool provided, applying sufficient pressure to produce a replica with a uniform pebblegrain appearance. (In a pinch, the rounded edge of the tape dispenser is also an acceptable tool.) Use either a circular, or x-y rubbing motion. Fully compress all parts of the film but be careful not to slide the film with respect to the blasted surface by bumping edges of the circular paper cutout. In general, too much compression is safer than too little.
- Step 8: Remove replica and place between anvils of micrometer gage, making sure replica is centered between anvils. Gage reading is a measure of average maximum peak-to-valley height of the blasted surface (when snap gage is adjusted as in step 3). If differing numerical values are obtained for the same site, the lowest value will tend to occur where the replica foam has been most completely compressed and therefore be the most reliable. Double check using a comparator.
- Step 9: If a measurement with either Coarse or X-Coarse grade is in the 1.5 to 2.5 mil (38 to 64 ?m) window (inclusive), take a 2nd reading with the OTHER grade. If both readings are in the 1.5 to 2.5 mil (38 to 64 ?m) range, record the average as the observed profile.
Readings made with either grade that are outside this range - i.e., between 0.8 and 1.4 mils (20 to 37 ?m) or between 2.6 and 4.5 mils (65 and 115 ?m) - should be used as is, i.e. without averaging. Note: The graphic on each piece of tape will help you remember this new averaging procedure.- Note 1: Rolls of old formulation (non-HT) Press-O-Film can be safely used with these new instructions.
- Note 2: If user circumstances warrant, the new (HT) tape can continue to be used with the old (non-averaging) instructions.
- Note 3: “Average” = add the Coarse reading to the X-Coarse reading and divide by 2.
- Note 4: Measurements made using the new POF-HT averaging procedure should be marked “HT”. If measurements are made without averaging, they should be marked “non-HT”.
 |
![]() Accuracy
Accuracy ![]()
NB: In cases where standards compliance is required, the full original current standard should be consulted.
Reproducibility and Accuracy of Measurement
Reproducibility (ASTM): ASTM standard D 4417-03 cites levels of reproducibility for both "X-Coarse" and "Coarse" grade replica tape. (A revision, with precision and bias data appropriate to Press-O-Film HT, is in development and will likely become available in early 2012. Preliminary results suggest that the associated, newer, testing will indicate that replica tape has much smaller levels of error than is reflected in the numbers below.)
For X-Coarse grade replica tape:
"Two results, each the mean of four replicates, obtained by operators in different laboratories should be considered suspect if they differ by more than 37%."
For Coarse grade replica tape, the equivalent level of reproducibility is cited as 28%.
According to these ASTM criteria, the following errors are the maximum that should be expected (according to the current version of the standard:
| Profile (mils) (microns) | Error ("Coarse") (mils) (microns) | Error ("X-Coarse") (mils) (microns) |
| 1.0 / 25 | 0.3 / 8 | Not Applicable |
| 2.0 / 50 | Not Applicable | 0.8 / 1.8 |
| 3.0 / 75 | Not Applicable | 1.1 / 27 |
| 4.0 / 100 | Not Applicable | 1.5 / 37 |
Accuracy (NACE): NACE Standard RP0287-95 addresses the issue of accuracy of measurement, reporting the results of round robin tests in which 14 blasted panels were measured by 7 laboratories. Replica tape and focusing microscope measurements agreed within their 95% confidence limits in 11 of 14 cases. The average difference between the two types of measurement was 0.2 mils (5 microns).
Reproducibility and Accuracy (Testex): By using a series of surfaces machined to known roughness, it is possible to test the accuracy and reproducibility of profile measurements made with replica tape and a micrometer gage. The surfaces used in Testex' internal testing were produced by making casts of grooves of known depth. The casts then consist of sharp-topped parallel "V-shaped" ridges of known height.
A blasted surface is highly irregular, unlike the regular grooved structure used in our tests. For this reason, the proper way to assess the accuracy of replica tape for evaluation of blasted surfaces is via the techniques used by the standards organizations concerned with such surfaces. In general, measurements of profile for highly irregular surfaces will be a strong function of the methods used to measure them.
Nevertheless, tests using casts of machined (as opposed to blasted) surfaces show micrometer gage measurements of Press-O-Film to have an accuracy and reproducibility of 0.25 mil (6 micrometers), across the ranges of Coarse and X-Coarse material. The casts of machined surfaces were measured with a light section microscope. These represent relatively idealized circumstances. Agreement between methods may or may not be as good for the case of blasted surfaces.
Testex' own testing on grit-blasted steel surfaces characterized with a number of fully electronic digital stylus instruments tends to support the grooved-surface error ( 0.25 mil or 6 micrometers) except in the profile range extending from 1.5 mils to 2.5 mils (38 to 64 um). The error associated with measurements in this range has a more complicated behavior.
Pass/Fail determinations of profile around the values 1.5, 2.0 and 2.5 mils (38, 50 and 64 um) will tend to be quite accurate. Pass/Fail assessments centered on other values in this range will be less accurate. Testex recommends that specifiers and inspectors agree, before beginning a job, on profile limits that take this circumstance into consideration.
In general, Testex replica tape determinations of profile will be similar in magnitude to the parameter Rt measured with fully digital electronic stylus devices. Replica measurements generally display statistical error behavior comparable to or better than that obtained with fully digital electronic stylus devices.
![]() Sources of Error
Sources of Error ![]()
A human hair is about 2 mils (50 microns) thick and individual bacteria are 0.1 mil (2.5 microns) in size. Field profile measurements to accuracies in this range will be influenced by subtle effects.
The four major sources of error in determining the profile of a blasted surface using replica tape and a micrometer gage are:
- Inherent variation in point-to-point profile over the surface being measured:
SSPC - The Society for Protective Coatings - is currently (2010) developing standardized guidance on number of measurements per unit area.
- Presence of particles of dirt on either the replica tape or gage:
Reasonable care should be taken to keep the gage anvils free of dirt or grit. Questionable measurements should be double checked.
- Gage accuracy:
Suitable micrometric thickness gages commonly cite an accuracy of ±0.2 mil (5 microns). In addition to gear errors of this magnitude, we have observed that they commonly read approximately 0.1 mil high at room temperature and 0.1 mil low at freezing. Only gages specifically designed for use with replica tape will have the correct accuracy, closing force, anvil/contact point dimensions and parallelism specifications.
- Rubbing technique:
Including excessive or inadequate burnishing force. See "Step 7 " of Instructions.
![]() Standards Compliance
Standards Compliance ![]()
Standards Governing Use of Replica Tape to Measure Profile
ASTM - (American Society for Testing and Materials) D 4417:
- Standard Test Methods for Field Measurement of Surface Profile of Blast Cleaned Steel
NACE - International (National Association of Corrosion Engineers) RP0287:
- Standard Recommended Practice: Field Measurement of Surface Profile of Abrasive Blast Cleaned Steel Surfaces Using a Replica Tape
SSPC - the Society for Protective Coatings
ISO - International Organization for Standardization: Standard ISO8503-5 Preparation of steel substrates before application of paints and related products - Surface roughness characteristics of blast-cleaned steel substrates - Part 5: Replica tape method for the determination of the profile
In cases where standards compliance is required, the full original current standard should be consulted.
![]() F.A.Q. Frequently Asked Questions
F.A.Q. Frequently Asked Questions ![]()
Why has Testex changed the formula for Press-O-Film?
“Old formulation” Press-O-Film softened at temperatures above 140 °F (60 °C). On the face of it, this would seem a safe operational upper limit. The highest recorded temperature on Earth is only 136 °F (58 °C) and the Threshold of Pain is less, approximately 125 °F (50 °C). Further, the maximum recommended temperature for application of many coatings is about the same as the Threshold of Pain.
While it is difficult to imagine using replica tape at temperatures above 140 °F (60 °C) it is, however, possible to imagine storing the tape at those temperatures, especially if the product is kept in a closed container (specifically, a car) in direct sunlight on a very hot day. Here, temperatures can get well above outdoor-ambient.
Press-O-Film HT’s new formulation adds 12 °F (6 °C) to the product’s softening point, a margin of safety that can be important to inspectors in extreme - and, especially, in remote - locations.
In Testex’ internal testing even the old formula replica tape showed no hint of collapse after 3 hours’ at 140 °F (60 °C) temperatures, so brief exposure to even very hot environments probably need not be a source of concern, however, for safety, exposure to temperatures above 152 °F (66 °C) should never be permitted. Replica tape should always be stored at or below outdoor-ambient temperatures. Long-term storage should be at room temperature, 77 °F (25 °C), or less.
The tape itself provides a record of its own thermal history. Un-compressed X-Coarse grade tape should have a thickness between about 5.0 and about 6.0 mils (about 125 and about 155 ?m). Thermal collapse will cause it to be less.
Old and New Replica Film Formulations:
You say the instruction change is related to the new high temperature formulation. Presumably measurements obtained from the old and new formulations are different. True?
In fact, tests show very similar replication and measurement results for replica film manufactured using the old and new chemistry. However theory associated with the change in chemistry does suggest some difference in response is possible even though we have not seen it in our tests. This is why we are recommending the instruction change now (2010).
Old and New Instructions:
Does tape measured according to the new instructions give different results from tape used with the old instructions?
There will be differences for profiles only in the 1.5 to 2.5 mil (38 to 64 um) overlap range. These differences will be modest compared to the uncertainty quoted in the precision and bias section of ASTM standard D4417 describing the use and behavior of replica tape. The new (averaging) instructions, however, will yield profiles that are more consistent and more directly comparable with those obtained using other methods.
Even if modest compared with the formal uncertainty, there can be differences between measurements made using old and new instructions. How do I handle this at a job site?
Rather than risk the possibility of inconsistent measurements in the 1.5 to 2.5 mil overlap range (38 to 64 um) we recommend that jobs currently in progress be completed using the old instructions (i.e., no averaging). Inspectors will always have the option of continuing to use the old instructions wherever agreements between contracting party and inspector specify doing so or where a need for process consistency requires it, however we do recommend switching to the updated instructions at the start of subsequent new jobs IF BOTH INSPECTOR AND CONTRACTOR ARE COMFORTABLE MAKING THE SWITCH.
Measurements made using the new POF-HT averaging procedure should be marked
“HT”. Measurements made using the old (non-averaging) procedure should be marked
“non-HT”.
What do you mean when you say “averaging” procedure?
The new instructions include the following guidance:
“Take an initial profile (roughness) measurement in the usual way with either Coarse or X-Coarse grade tape. If the result is between 1.5 and 2.5 mils (38 to 64 ?m) inclusive, take a 2nd measurement with the OTHER grade. If both measurements are in the 1.5 to 2.5 mil (38 to 64 ?m) range, add the two measurements together and divide by two”.
This is the “average”, and it is the profile value you should record.
If either of the two measurements is outside the 1.5 to 2.5 mil (38 to 64 ?m) overlap range, record it as is, i.e., without averaging.
How do I remember all these numbers on a job site?
Every piece of the newly designed tape includes a small graphic that illustrates both the tape's full range and the region of overlap. It includes all the numbers you need to know.
I just received a shipment of the old non-HT Press-O-Film. Can I exchange it for the newer product?
No need. Testex has been gradually introducing the new film - though on the old-style tapes - since at least the beginning of 2010. Replica film mounted on old-style tapes purchased in the last 6 to 8 months is the same product as on the new-style tapes.
Can I average readings made using non-HT “Coarse” with readings made using HT “X-Coarse” (and vice versa)?
Yes. Again, replica film purchased since at least the beginning of 2010 was manufactured using the new process. New and old rolls can be used interchangeably.
Can I use the old (non-HT) product with the new instructions?
Yes. Again, because virtually all replica film already in circulation, even on the old design tape, is actually the new product, new and old rolls are functionally the same.
Can I use the new (HT) product with the old instructions?
Yes. Although Testex recommends that inspectors adopt the new (averaging) instructions at their earliest convenience, there will be transitional situations under which the need for consistency requires that the old instructions continue to be used until a job is finished. This is a matter for agreement between contractor and inspector.
Will differences between measurements obtained using old vs. new instructions be greater than the formal uncertainty of measurement?
No. Measurements made with old or new instructions will differ by less than the uncertainty established in the precision and bias section of D 4417, ASTM’s standard governing replica tape roughness determination.
Testex has always called attention to the fact that “replica tape measurements are most accurate near the middle of each grade’s range”. The new instructions offer a formalized way to act on that guidance and will provide better accuracy and consistency.
I am surprised that the uncertainty of measurement cited in the ASTM standard is as large as it is.
ASTM has a very careful and rigorous testing and analysis procedure but the calculated uncertainties in the current version of its D4417 standard were derived from tests that mistakenly included surfaces outside the specified range of the tape. This is believed to have resulted in unrepresentatively large error bars. New testing in support of a revised Precision and Bias section for ASTM standard D4417 is scheduled for 2011. An updated (2012) version of the standard will include characterization data that better reflects the current product.
What is the expected "updated" uncertainty of measurement? How do replica tape measurements of profile compare with other methods?
Testex' own precision and bias testing suggests that over most of the 0.8 to 4.5 mil (20 um to 115 um) range the (single replica, one standard deviation) error is approximately ± 0.2 mils (± 5 um). Replica tape determinations of profile are similar in magnitude to the parameter Rt measured with fully digital electronic stylus devices. Replica measurements generally display better statistical error behavior.
Error associated with replica tape measurements in the Coarse/X-Coarse overlap region extending from 1.5 mils to 2.5 mils (38 to 64 um) has a somewhat more complicated behavior than error behavior outside this range. Pass/Fail determinations of profile around the values 1.5, 2.0 and 2.5 mils (38, 50 and 64 um) will tend to be quite accurate. Pass/Fail assessments centered on other values in this (1.5 - 2.5 mil "overlap") part of the range will be less accurate. Testex recommends that specifiers and inspectors agree, before beginning a job, on profile limits that take this circumstance into consideration.
Do the instruction changes affect how I should make measurements using either Coarse Minus or X-Coarse Plus grades?
No. Coarse Minus or X-Coarse Plus grades should continue to be used to check measurements made at the upper and lower ends of Press-O-Film’s primary range (0.8 to 4.5 mils or 20 to 115 um). At present, replica film for both of these check grades is manufactured using the old chemistry, but we will be gradually switching over to the new formulation for these products as well.
Do the instruction changes affect how I should make metalized measurements?
No. Our metalized film is measured using an entirely different procedure. You should continue to use it as you always have.
![]()


