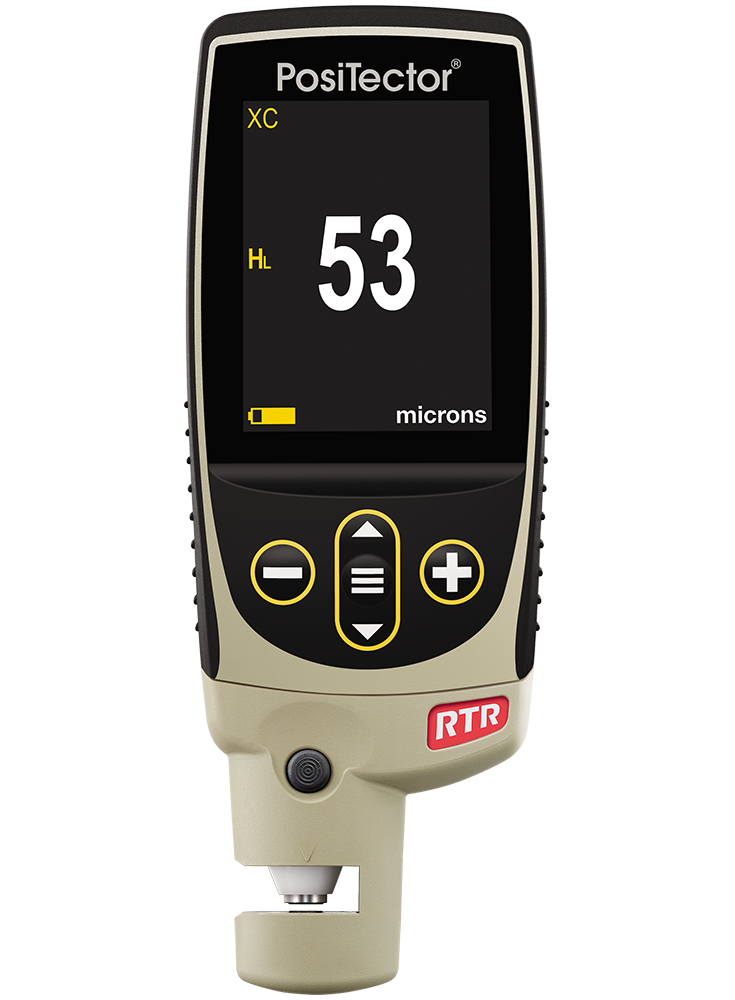
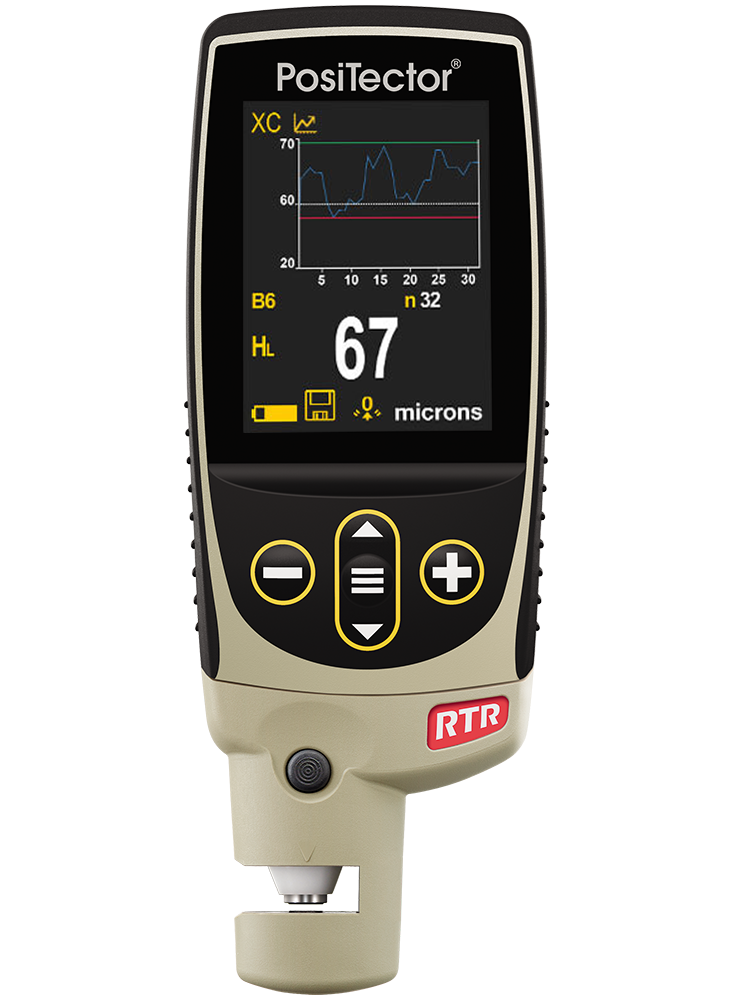
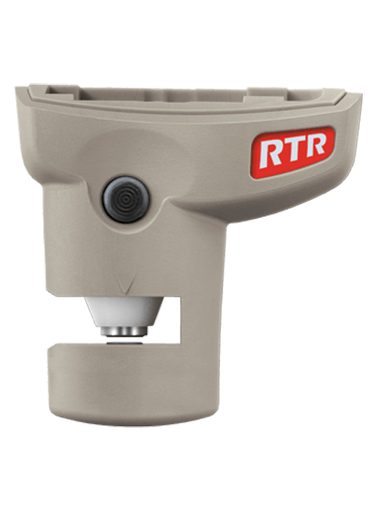
DeFelsko PosiTector RTR H

Electronic Surface Profile Gage for Blasted Steel and Textured Coatings

Digital spring micrometers measure and record surface profile parameters using Testex Press-O-Film™ replica tape—producing a more accurate peak-to-valley height measurement.

  • Ready to measure—no calibration adjustment required for most applications
  • NEW Larger 2.8" impact resistant color touchscreen with redesigned keypad for quick menu navigation
  • NEW Weatherproof, dustproof, and water-resistant—IP65-rated enclosure
  • PosiTector interchangeable platform—attach any PosiTector probe to a single gage body
  • USB, WiFi, and Bluetooth connectivity to PosiSoft PC, Mac, and Smartphone software
  • Certificate of Calibration showing traceability to PTB included (Long Form)

Conforms to ASTM D4417, ISO 8503-5, NACE RP287, SSPC-PA 17, SSPC-SP5, SP6, SP10, SP11-87T, and others


line
DeFelsko PosiTector RTR H Surface Profile Gage: Models Available
line


Product

DeFelsko RTRH1-G PosiTector RTR H1 Standard Replica Tape Reader / Surface Profile Gage DeFelsko RTRH3-G PosiTector RTR H3 Advanced Replica Tape Reader / Surface Profile Gage DeFelsko PRBRTRH PosiTector RTR Replica Tape Reader Probe Only
Order Code RTRH1-G RTRH3-G PRBRTRH
Peak Height (Hl) Measurement Range 20 to 115 μm (0.8 to 4.5 mils) 20 to 115 μm (0.8 to 4.5 mils) 20 to 115 μm (0.8 to 4.5 mils)
Peak Height (Hl) Accuracy ± 5 μm (± 0.2 mils) ± 5 μm (± 0.2 mils) ± 5 μm (± 0.2 mils)
Peak Height (Hl) Resolution 1 μm (0.1 mils) 1 μm (0.1 mils) 1 μm (0.1 mils)
Anvil Diameter Ø6.3 mm (Ø0.25 inch) Ø6.3 mm (Ø0.25 inch) Ø6.3 mm (Ø0.25 inch)
Anvil Pressure 1.1 Newtons (110 gram-force) 1.1 Newtons (110 gram-force) 1.1 Newtons (110 gram-force)


line
DeFelsko PosiTector RTR H Surface Profile Gage: Features
line

Simple

  • Measures peak height (HL)
  • Automatically subtracts the 50.8 μm (2 mils) incompressible film from all readings
  • Minimizes inspector workload by reducing the number of replicas needed to ensure accuracy
  • NEW Larger 2.8" impact resistant color touchscreen with redesigned keypad for quick menu navigation
  • NEW On-gage help explains menu items at the touch of a button
  • RESET feature instantly restores factory settings
  • Durable
  • NEW Weatherproof, dustproof, and water-resistant—IP65-rated enclosure
  • Rugged indoor/outdoor instrument—ideal for field or shop use
  • NEW Ergonomic design with durable rubberized grip
  • Shock-absorbing, protective rubber holster for added impact resistance
  • Two year warranty on gage body AND probe

Accurate

  • Produces a more accurate peak-to-valley height measurement. See linearized peak height (HL)
  • Certificate of Calibration showing traceability to PTB included (Long Form)
  • Conforms to national and international standards including ISO 8503-5, ASTM D4417 Method C, NACE RP0287 and SSPC-PA17

Versatile

  • PosiTector body accepts all PosiTector RTR, SPG, 6000, 200, DPM, IRT, SST, SHD, BHI, and UTG probes easily converting from a surface profile gage to a coating thickness gage, dew point meter, soluble salt tester, hardness tester, or ultrasonic wall thickness gage
  • Mils/Microns switchable
  • Selectable display languages
  • NEW Auto rotating display with Flip Lock

Powerful

  • Statistics mode continually displays/updates average, standard deviation, min/max, and number of readings while measuring
  • NEW Screen Capture—save 100 screen images for record keeping and review
  • NEW Instant-on feature quickly powers up the gage if recently powered down
  • NEW Up to 30% longer battery life
  • USB port for fast, simple connection to a PC and to supply continuous power. USB cable included
  • PosiSoft USB Drive—stored readings and graphs can be accessed using universal PC/Mac web browsers or file explorers. No software required.
  • Every stored measurement is date and time stamped
  • Software Solutions for viewing, analyzing & reporting data
  • Software Updates via web keep your gage current


line
DeFelsko PosiTector RTR H Surface Profile Gage: Standard Model Feature
line

Includes ALL features as shown above plus:

  • NEW Storage of 1,000 readings per probe—stored readings can be viewed or downloaded


line
DeFelsko PosiTector RTR H Surface Profile Gage: Advanced Model Features
line

Includes ALL features as shown above plus:

  • NEW Storage of 250,000 readings from multiple probes in up to 1,000 batches
  • Live graphing of measurement data
  • NEW Touchscreen keyboard for quickly renaming batches, adding notes, and more
  • WiFi technology wirelessly synchronizes with PosiSoft.net and downloads software updates
  • Bluetooth 4.0 Technology for data transfer to a mobile device running the PosiTector App or optional portable printer. BLE API available for integration into third-party software.
  • Integrate with third-party software, drones, ROVs, PLCs, and robotic devices using several industry-standard communication protocols


line
DeFelsko PosiTector RTR H Surface Profile Gage: Specifications
line

Peak Height (HL) Measurement Range 20 to 115 μm (0.8 to 4.5 mils)
Peak Height (HL) Accuracy ± 5 μm (± 0.2 mils)
Peak Height (HL) Resolution 1 μm (0.1 mil)
Anvil Diameter Ø6.35 mm (Ø0.25 inch)
Anvil Pressure 110 gram-force (1.1 Newtons)
Size 152 x 61 x 28 mm | (6" x 2.4" x 1.1")
Weight 140 g (4.9 oz.) without batteries


lineHow It Works
line

  1. Prepare

Preparation of both the surface to be tested and the PosiTector RTR H are necessary before performing the test.

To prepare surface:

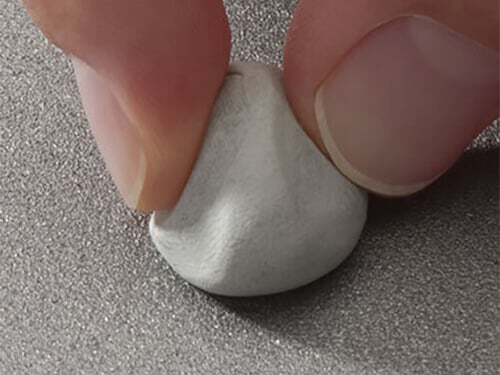
  • Use cleaning putty to remove dust, debris, or residual blast media from the measurement site by firmly pressing the putt0,y onto surface to be tested using your fingers and remove

To prepare the PosiTector RTR H:

  • Clean anvils using included cleaning card. Swipe card through opening a few times while firmly pressing both probe buttons to remove dust
  • Zero probe and verify accuracy with included shim
  • Ensure correct grade of replica tape is displayed in upper left hand corner of LCD
  1. Burnish

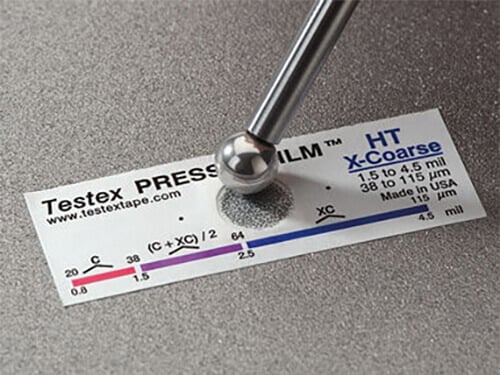
Testex Press-O-Film™ replica tape consists of a layer of compressible foam affixed to an incompressible polyester film of highly uniform thickness. When pressed against a roughened steel surface, the foam forms an impression, or reverse replica, of the surface.

  • Select appropriate grade of replica tape based on target profile
  • Pull a single adhesive-backed replica tape free of its release paper and apply to blasted surface
  • Firmly compress replica film using the rounded end of the included stainless steel burnishing tool. Apply sufficient pressure in a circular and x-y rubbing motion for 30-60 seconds to fully compress all parts of the film. In general, too much compression is safer than too little.
  • When complete, remove replica tape from surface
  1. Measure

Placing the compressed tape (replica) into the PosiTector RTR H gives a measure of the average maximum peak-to-valley height of the surface roughness profile.

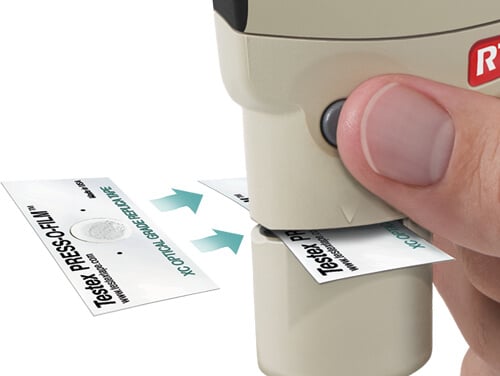
  • Insert the burnished replica tape into the measurement opening. Ensure the tape is properly positioned so that the burnished region is centered within the opening in the probe with the adhesive (sticky) side down.
  • To position the tape, move the Testex™ Press-O-Film™ replica tape to the back of the probe and align the two dots (printed on replica tape) with arrows on both sides of the measurement opening.
  • Once positioned, firmly press both probe buttons simultaneously and hold until the PosiTector RTR H beeps and the measurement is displayed.

The gage automatically subtracts the thickness of the polyester substrate from all measurements.


lineDeFelsko PosiTector RTR H Surface Profile Gage: Videosline


line
PosiSoft Suite of Software
line

Four FREE and unique ways to view and report your PosiTector and PosiTest data. Learn More

  • PosiSoft Desktop
  • PosiSoft.net
  • PosiTector App
  • PosiSoft USB


lineDeFelsko Accessoriesline

Accessories for DeFelsko Inspection Instruments - Online Catalog


line
Downloads
line

DeFelsko PosiTector RTR H Surface Profile Gage for Blasted Steel and Textured Coatings - Literature
DeFelsko PosiTector RTR H Surface Profile Gage for Blasted Steel and Textured Coatings - Instruction Manual
DeFelsko PosiTector RTR H Surface Profile Gage for Blasted Steel and Textured Coatings - Linearization of Roughness Measurements
DeFelsko Accessories for Inspection Instruments - Online Catalog

F.A.Q.

Is the PosiTector RTR H calibrated at the factory?

The PosiTector RTR arrives fully calibrated and ready to measure. A Long-Form Certificate of Calibration traceable to NIST is included, which documents actual readings taken by your instrument at our calibration laboratory on standards traceable to a national metrology institute. Beware of 'Certificates' or 'Certificates of Conformance' offered by competitors. These typically do not include actual instrument readings, and are often insufficient to meet common quality requirements.

Verification of gage calibration and accuracy can be performed with the supplied check shim, which is specifically intended for all PosiTector RTR probes. 

What is replica tape?

Testex Replica Tape is a long-known method for characterizing a surface. It is simple, relatively inexpensive, and shows good correlation with results from other methods. It has the advantages of ruggedness, relatively low start-up cost, good repeatability and the option of retaining a physical replica of the surface being evaluated. The method is widely used and widely understood. It is particularly useful for measurements on curved surfaces that are difficult to measure directly with other instruments.

It is therefore not surprising that it has become the most popular field method for measuring surface profile. Its operation is described in a number of international standards including ASTM D4417, ISO 8503-5, NACE SP0287, and AS 3894.5.


What grades of replica tape is the PosiTector RTR H compatible with?

The PosiTector RTR measures the two primary grades of Testex Replica Tape: Coarse and X—Coarse. The other grades of replica tape, Coarse Minus and X—Coarse Plus, are check grades that are used only to confirm or improve the accuracy of conventional analog spring micrometer measurements at the lower end of the Coarse tape's range (Coarse Minus) and at the upper end of the X—Coarse tape's range (X—Coarse Plus). Since the PosiTector RTR automatically corrects for the non—linearity of Coarse and X—Coarse tape, these other check grades are not required.

Why should I purchase the PosiTector RTR H over a conventional snap gage?

The PosiTector RTR offers a number of advantages over a mechanical spring micrometer:

  • Linearization feature increases measurement accuracy and reduces tape consumption.
  • Unique opposing spring design prevents undesired user interferences from occurring.
  • Large digital display for clear, easy-to-read measurements with the ability to store and download readings.
  • Arrives fully calibrated and includes a traceable calibration certificate.
  • Interchangeable probe design offers the ability to use a single PosiTector gage body for a wide variety of applications: surface profile, coating thickness, wall thickness, salt contamination, Shore hardness and environmental.

Is the PosiTector RTR H as accurate as conventional spring micrometers?

The PosiTector RTR's displayed HL (linearized height) value is a more accurate surface profile measurement because it adjusts for tape non—linearity without the need to average the results from 2 or more replicas. Linearization is a technique used to insure uniform accuracy of measurement in many types of advanced sensors. Its use in connection with replica tape is described here.

Do I need to take two measurements in some surface profile ranges with the PosiTector RTR H, as is required with the spring micrometer?

No. With a single measurement, the gage produces a more accurate peak—to—valley height measurement HL. The advantages are a reduction in measurement uncertainty, inspector workload, the likelihood of error, and the number of replicas needed by inspectors to assure accuracy.

Together with Testex, DeFelsko determined the non—linear relationship between actual steel profile peak—to—valley heights and their replicated heights on tape. By adjusting for this non-linearity, the PosiTector RTR is able to overcome the shortcomings imposed by replica tape foam.

Why does the blasted steel under the burnished replica tape appear shiny, and different from the surrounding area?

Abrasive blasting often leaves debris on the surface, which changes its appearance. If the surface isn't cleaned with the included cleaning putty before measuring, the replica tape captures this debris and 'cleans' the surface where the tape was burnished. This may make the test area appear 'shiny' compared to the surrounding area, and is not a sign of damage to the blast profile.

How do you position replica tape into the PosiTector RTR H?

Testex Press—O—Film Replica Tape is produced with two positioning dots that align with arrows located on both sides of the PosiTector RTR's probe. Move the tape to the back of the probe, align the dots, and then press the two probe buttons. Measurement is fast, simple and accurate.

Should I purchase the PosiTector RTR Replica Tape Reader or PosiTector SPG Surface Profile Gage for my application?

Both instruments conform to ASTM D4417 "Standard Test Methods for Field Measurement of Surface Profile of Blast Cleaned Steel".

The PosiTector SPG conforms to Method B of ASTM D4417. The PosiTector SPG measures quickly, and has no per-test cost. It keeps a digital record of each measurement, is less operator dependent, as no burnishing of replica tape is required. It also has a greater range than replica tape.

The PosiTector RTR conforms to Method C of ASTM D4417. It is used together with Testex Replica Tape, a widely used and respected method to measure surface profile. It has the ability to measure on curved surfaces, and gives the user the option to retain the replica tape; a physical replica of the tested surface.

What is the spring pressure on the probe? Do I have to apply a specific pressure to the buttons?

The anvil impact force of the PosiTector RTR is identical to that of conventional mechanical spring micrometers. The PosiTector RTR has the same anvil size (0.25 inch / 6.25mm diameter) and applies the same spring tension (110 gram—force / 1.1 Newtons) as Testex micrometers and as required by major test standards.

An issue with mechanical spring micrometers is that they can under—read if a user drops the measuring anvils onto the replica tape too fast. Other errors can occur if the user presses upward on measuring arms to “stabilize” readings. Both actions force conventional micrometers to read lower by crushing the tape's delicate microfoam.

The PosiTector RTR's unique opposing spring design prevents these undesired user interferences from occurring. Pressing the two probe buttons releases a holding spring. That allows a second spring, the anvil spring, to apply a constant pressure measuring force on the replica. This measuring force is not coupled to the buttons so the user cannot alter the applied pressure and inadvertently influence results.

How often should the PosiTector probe be recalibrated?

PosiTector probes include a Certificate of Calibration showing traceability to NIST or PTB included (Long Form) with each probe—with no expiry or end date. They have no shelf life, therefore the length of time in the field is not a good indicator for recalibration intervals. Many organizations with quality programs and recertification programs require annual recalibrations, and this is a good starting point for most users. DeFelsko recommends that customers establish calibration intervals based upon their own experience and work environment. Based on our product knowledge, data and customer feedback, a one year calibration interval from the date the instrument was placed in service is a good starting point.